
Last Updated: October 23, 2026
Quick Summary
To set up sound equipment in small venues, use a compact PA system, a small mixer, the right microphones, and a sensible layout. Place speakers at the front on either side of the performance area, raised to ear height and angled inward, and keep them in front of microphones. Power the mixer on before the speakers to avoid a damaging pop.
- Match the system to the room, not to the biggest gig you can imagine.
- Rent a PA system for your first few events before committing to buying gear.
- Follow signal flow from source to cable, mixer, amplifier, then speaker.
- Two speakers usually cover a small room; adding more often muddies the sound.
- Keep microphones behind the speakers and pointed away from them to prevent feedback.
Table of Contents
- Sound Equipment for Small Venues: What You Actually Need
- Planning the Setup: Room Layout, Capacity and Signal Flow
- Speaker Placement for Small Venues
- Connecting Mixers, Amplifiers and Audio Sources
- Microphone Setup and How to Prevent Microphone Feedback in Live Sound
- Taming Room Acoustics, Reverberation and Echo
- Your Small Venue Soundcheck Checklist
- Conclusion
- Frequently Asked Questions
Sound Equipment for Small Venues: What You Actually Need
Setting up sound equipment in small venues comes down to four things: a compact PA system, a small mixer, the right microphones, and a sensible layout. Get those right and a 60-capacity room can sound warm and clear without a wall of gear. At Plonkers Wine Bar, we run live music and open mic nights in a snug riverside room. To picture the kind of room and kit you’re setting up for, see our live music venues in York.
For anyone learning how to set up sound equipment in small venues, the temptation is to buy everything at once. Resist it. Most small-room problems come from too much gear in too little space, not too little gear.
Matching the Kit to the Room
The room decides the kit. A low-ceilinged bar with soft furnishings needs far less power than a high, hard-walled hall.
Start by answering three questions:
- How many people will be in the room?
- Is the main use speech, solo music, or a full band?
- Are the walls and floor hard or soft?
Soft rooms (curtains, carpet, upholstery) soak up sound, so you can push volume harder. Hard rooms bounce it back at you. Match the system to the room, not to the biggest gig you can imagine.
Rental Versus Buying
Buying makes sense once you’re running events regularly. For occasional nights, hire first.
A common approach is to rent a PA system for your first few events. You learn what the room needs without committing to gear that might not suit it. Once you know your room, buy the pieces you use most: speakers, a mixer, and a couple of microphones.
Ask the hire company to include stands, cables, and a mixer in the package. Cables are the item everyone forgets, and one missing lead can stop a whole night.
Planning the Setup: Room Layout, Capacity and Signal Flow
Plan the room before you plug anything in. Draw the space, mark where the audience sits, and decide where the performance area goes. Venue capacity drives everything: speaker positions, cable runs, and how much space you have for a mixer.
Unusual spaces need extra thought. Odd corners, pillars, and split levels all affect where sound travels, so walk the room and picture the audience’s sightlines and hearing lines together. Our guide to unique event venues in York shows how unusual spaces and capacities shape layout and signal-flow planning. For a sense of how different room shapes change a layout, it helps to see how venues with character handle their spaces. If you’re planning for a set number of guests, our guide to planning private events for 40 guests covers room planning for a specific headcount.
A Simple Signal-Flow Map for Beginners
Signal flow is the path sound takes from source to speaker. Learn it once and every setup makes sense.
Here is the beginner-friendly version:
- Source – microphone, laptop, or instrument
- Cable – carries the signal to the mixer
- Mixer – sets levels and shapes the sound
- Amplifier – boosts the signal (built into powered speakers)
- Speaker – turns the signal into sound
Follow that order every time. If something isn’t working, trace the path from source to speaker and you’ll find the break.
Here is the signal path sound follows from source to speaker, in the order you should follow it.
| Step | Component | What it does |
|---|---|---|
| 1 | Source | Microphone, laptop, or instrument |
| 2 | Cable | Carries the signal to the mixer |
| 3 | Mixer | Sets levels and shapes the sound |
| 4 | Amplifier | Boosts the signal, built into powered speakers |
| 5 | Speaker | Turns the signal into sound |
Speaker Placement for Small Venues
Speaker placement for small venues is the single biggest factor in how your system sounds. Put speakers in the wrong spot and even good gear sounds muddy.
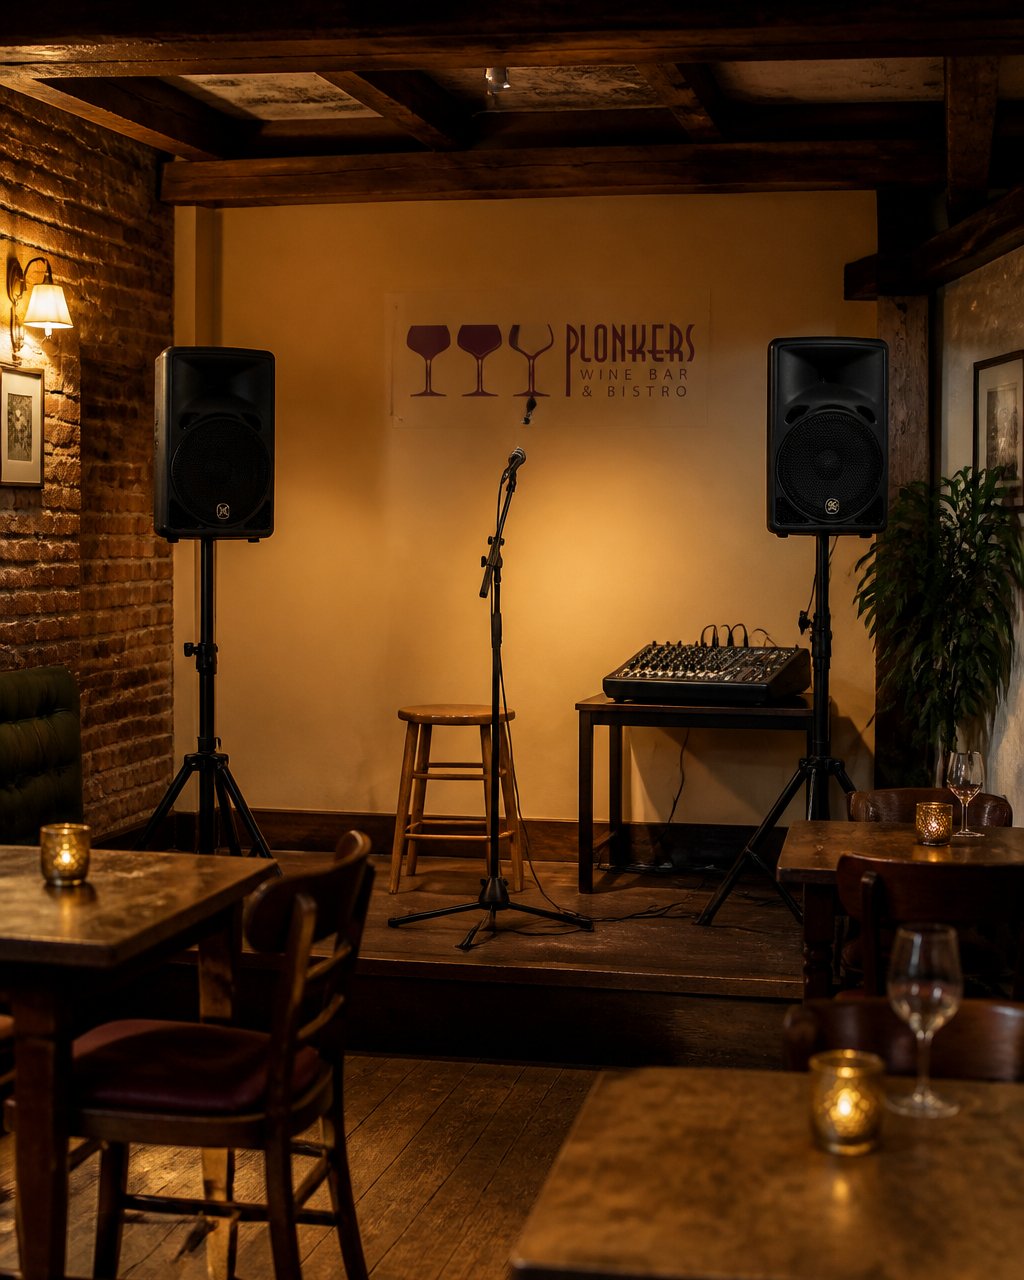
The basics:
- Place speakers at the front, either side of the performance area
- Raise them to ear height for seated listeners
- Angle them slightly inward toward the audience
- Keep them in front of microphones, never behind
Powered speakers make this easy: the amp is built in, so you just run a cable from the mixer. For a small room, two speakers usually cover the whole space. Adding more rarely helps and often muddies the sound. Proper placement remains just as critical as the gear itself, so take a moment to consider how you position hifi speakers to ensure the soundstage remains clear and balanced throughout the venue.
Connecting Mixers, Amplifiers and Audio Sources
Connect sources to the mixer first, then the mixer to the speakers. That order keeps things simple and makes faults easy to find.
A basic connection routine:
- Plug microphones into the first channels
- Add instruments or a laptop to spare channels
- Connect the mixer’s main output to your powered speakers
- Plug everything into one power source to avoid hum
Label your cables. It sounds fussy until the first event, when you’re hunting for the right lead in dim light. Coloured tape or labelled plugs save minutes and stress.
Plugging speakers in after the mixer is powered on can cause a loud pop that damages speakers and startles the room. Power the mixer on first, then the speakers. Reverse the order when shutting down.
Microphone Setup and How to Prevent Microphone Feedback in Live Sound
To prevent microphone feedback in live sound, keep microphones behind the speakers and pointed away from them. Feedback is a loop: the mic picks up speaker sound, the system amplifies it, and the loop grows into a howl.
Practical steps:
- Point mics away from speakers
- Keep mics close to the performer’s mouth
- Lower the gain before raising the master volume
- Cut the frequency that’s ringing using the mixer’s EQ
Wireless microphones add freedom but need clear line of sight to their receiver. For a real-world look at how small rooms handle mics and feedback, our open mic nights guide provides insights.
Taming Room Acoustics, Reverberation and Echo
Room acoustics decide whether your careful setup sounds clean or chaotic. Hard surfaces create reverberation and echo, and small rooms suffer most because sound bounces back quickly.
Fixes that don’t cost much:
- Hang curtains or soft panels on bare walls
- Add rugs to hard floors
- Move speakers away from corners
- Seat the audience close to the performers
Near-field reflections, the bounce off nearby walls, are the usual culprit in small rooms. Softening those surfaces does more than any gadget.
In a small room, soft furnishings often improve sound more than extra equipment. Treat the room before you upgrade the kit.
Your Small Venue Soundcheck Checklist
A small venue soundcheck checklist keeps every event consistent. Run it in the same order each time and problems surface before the doors open.
- Power on the mixer, then the speakers
- Check every microphone one at a time
- Set gain so the loudest moment doesn’t peak
- Walk the room and listen from the back
- Test playback from your audio sources
- Confirm volume levels suit the room
- Check hearing safety: is it comfortable at the front?
- Label and tidy cables before doors open
Gain staging, setting levels correctly at each stage, is the skill behind a clean soundcheck. Set the source level first, then the channel, then the master.
Record the soundcheck on your phone from the back of the room. What sounds balanced at the mixer often sounds different where the audience sits.
Conclusion
Setting up sound equipment in small venues is about matching gear to the room, planning the layout, and running a repeatable soundcheck. Do those three things and small spaces sound far better than their size suggests.
At Plonkers Wine Bar, we’ve built our live music and open mic nights around a modest setup and a warm welcome. If you’re planning your own event and need a space that works, our guide to bar hire explains how to book the right room. Get started with Plonkers Wine Bar and give your next event a sound that fits the room.
Frequently Asked Questions
What is the best sound equipment for small venues?
For most small rooms, a pair of powered speakers on stands, a compact mixer with enough channels for your microphones and instruments, and a couple of wired or wireless microphones cover the basics. Powered speakers save you carrying a separate amplifier, and a mixer with around eight channels leaves room for a band or a solo act plus a laptop. Buy or rent only what the room and the event need, and add monitors or DI boxes once you know how the space behaves.
How should speakers be positioned in a small venue?
Place the speakers at the front of the performance area, ideally on stands so the tweeters sit around ear height for a standing audience or just above seated listeners. Angle them slightly inwards so coverage overlaps in the middle of the room rather than firing straight into the side walls. Keep them clear of corners, which exaggerate bass and reflections, and check that the front row is not directly under the speakers, where the sound becomes harsh and hard to balance.
How do you prevent feedback in a small venue?
Feedback usually starts with a microphone too close to a speaker or a gain set too high. Point microphones away from the speakers, keep the vocalist behind the speakers rather than in front of them, and set gain staging carefully so each channel is loud enough without pushing the master. If a frequency rings, pull it back slightly on the EQ rather than turning everything down. A quick ring-out before doors open catches most problems while the room is still quiet.
How do you soundcheck a small venue?
Run a small venue soundcheck checklist: power up in the right order, confirm every cable and channel, set gain on each microphone one at a time, then bring up the full mix. Ask each performer to play or sing at their real volume, adjust EQ and levels, and walk the room to hear what the audience will hear. Save a few minutes at the end for a full run-through of an opening number, and label channels and cables so the next setup is faster.
